OMFIT knowledgebase
Data management within OMFIT
The defining characteristic of the OMFIT framework is its free-form hierarchical data structure (the OMFIT-tree), which is used to exchange information among different physics codes. Here free-form means that the content and organization of the data are not defined a priori, but can be set by users and may change depending on the specific application. In practice, the OMFIT-tree is an abstraction that provides a uniform way to access data from heterogeneous objects, independently of their origin or their low-level storage details. The content of objects that are loaded in the OMFIT-tree are dynamically loaded in memory at runtime based on the workflow, to reduce memory consumption and ensure good performance. The OMFIT-tree is central to the operation of the framework, and users can interact directly with it via a GUI.
In OMFIT, workflows are coded as Python scripts, which are also stored within the OMFIT-tree. Scripts can call each other and exchange data through direct calls, or via the globally-accessible OMFIT-tree. The framework provides high-level functions to transfer data and execute codes serially or in parallel on remote servers, submit and monitor jobs on High Performance Computing (HPC) batch systems, create workflow-specific Graphical User Interfaces (GUIs), and post-process and visualize data. Collections of objects that are used to perform a specific task, such as running a physics code or executing more complex workflows, are organized into so called “modules”– the building blocks of OMFIT workflows. Users can import existing modules into the OMFIT-tree, and use them as part of their own workflows. Modules are also free-form, and can be hierarchically combined to create complex workflows. [Not yet in the unstable branch: OMFIT has been instrumented with capabilities from the MPO project to automatically build a graph representing the execution of scripts within a workflow (not yet the data flow).]
At any time users can save the OMFIT-tree data structure (containing both the simulation data as well as the scripts describing the workflows) to disk for long-term storage, into a “project”. Projects can then be reloaded into OMFIT and users can continue with their work (or share it) from the point where they left it. Since projects contain a snapshot of the state of the OMFIT-tree at the time the data structure was saved, any subsequent update that is done on the modules’ source-code does not affect the functionality of older projects. This important feature enables the incremental development of the framework, without breaking the functionality or repeatability of the results of older projects. The OMFIT source code (framework and modules) is hosted on the GitHub online private repository.
Where is module data saved?
The scripts, settings, and files for each module are located in an OMFIT repo in OMFIT-source/modules/<name of module>.
In the default mode that OMFIT starts, when a module is imported into an existing OMFIT session, OMFIT makes a copy of
each file of the module in that repo for use in that OMFIT session in the directory specified by the environment
variable OMFIT_TMPDIR. If the session is saved as an OMFIT project, then a copy of the scripts (and data) are made to
a staging area, and then possibly zipped up together to store on disk as an OMFIT project in the OMFIT projects area.
There are three purposes of making copies:
it protects users from continual changes as OMFIT is updated while the session is open
it allows a public session of OMFIT to be used by multiple users, without each user mucking with the public version of the code
it allows a user to open an old project and have the same scripts as were used previously to reproduce a workflow at a later time
OMFIT temporary files and disk usage
When OMFIT creates file-backed objects in the tree, those objects are backed by
files stored on disk under the directory specified by the environment variable
$OMFIT_TMPDIR. By default, this is typically a node-local scratch filesystem
(e.g. /local-scratch on many clusters).
Within $OMFIT_TMPDIR (which defaults to /tmp), OMFIT organizes temporary files as:
$OMFIT_TMPDIR/$USER/OMFIT/
Each OMFIT GUI or non-GUI session creates its own session directory within this location. Session directories are named using the timestamp at which the session was started, for example:
OMFIT_2025-10-02_08_51_43_675616
A listing of the directory may therefore look like:
$ ls -1 $OMFIT_TMPDIR/$USER/OMFIT
OMFIT_2025-10-02_08_51_43_675616
OMFIT_2025-10-02_08_52_16_882355
OMFIT_2025-10-04_01_32_59_636091
OMFIT_2025-12-11_22_03_22_318196
Each entry corresponds to a separate OMFIT session.
Inside an existing session, files in the session directory that are no longer associated with an OMFIT tree item can be deleted with OMFIT.clean_unassociated_files().
Session cleanup behavior
Under normal operation, OMFIT automatically removes its session directory when the session exits cleanly (GUI or otherwise). However, if a session is terminated abnormally (e.g. killed process, node reboot, crash), its session directory may remain on disk.
When starting or closing a new OMFIT session, users may be prompted to clean up old session directories that appear to be left over from previous runs. Unless you are actively attempting to recover files from a crashed session, it is recommended to answer Yes to this prompt.
Regularly closing OMFIT sessions that are no longer in use is the primary way to ensure temporary disk usage is released.
Inspecting disk usage
At any time, users can inspect their OMFIT temporary disk usage with:
$ du -sh $OMFIT_TMPDIR/$USER/OMFIT/*
This will report the disk usage associated with each session directory. Large directories typically indicate sessions with many file-backed objects or large datasets.
Using external references to reduce temporary disk usage
In addition to closing unused sessions, OMFIT provides a mechanism to move
file-backed objects out of $OMFIT_TMPDIR while keeping them visible and
usable in the OMFIT tree.
An OMFIT user can right-click on any OMFITtree entry in the tree and select:
External reference -> Deploy + modifyOriginal + readOnly
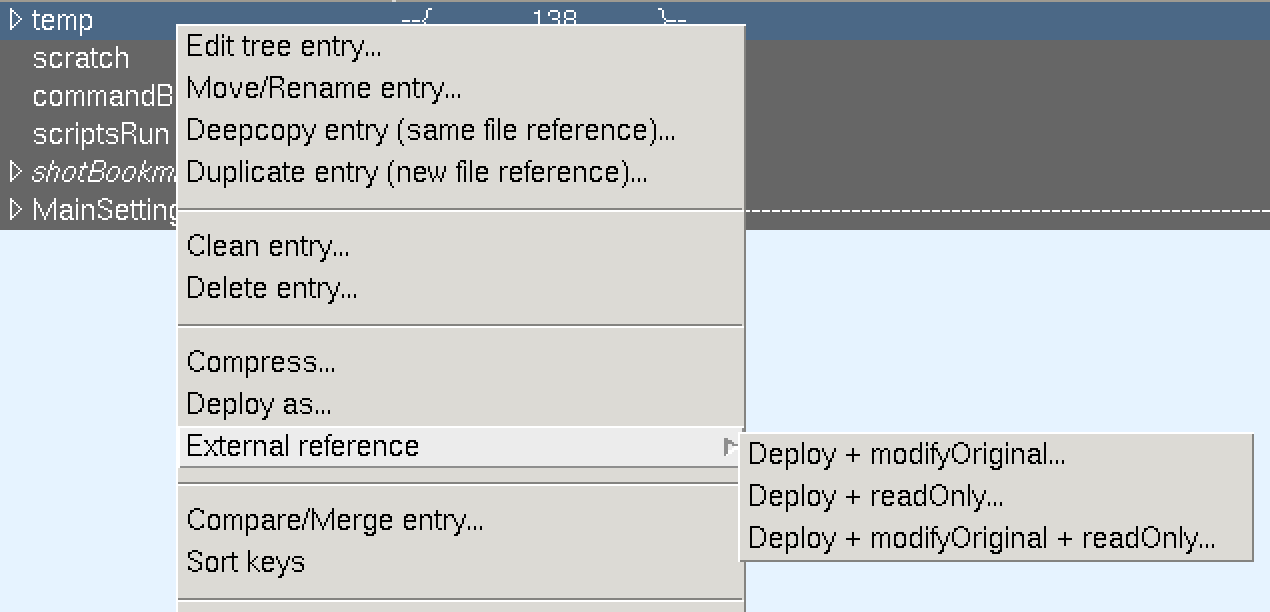
Right-click menu for deploying an external reference from the OMFIT tree.
When this option is selected, a dialog box prompts the user to choose a target
directory. OMFIT then deploys the underlying files to that external location
(which should not be within $OMFIT_TMPDIR) and replaces the tree entry with
an external reference.
Behavior and implications
The objects remain visible in the OMFIT tree and behave as normal tree entries.
The files backing those objects are stored outside of both the OMFIT project and
$OMFIT_TMPDIR.The
readOnlysetting ensures that the external files are not accidentally modified by subsequent OMFIT operations and allows for faster project savingOnly final versions of files should use external references. They will persist in that location after the OMFIT session ends.
Any user who creates external references will be responsible for deleting those files outside of OMFIT if they are no longer valuable.
If the external references no longer exist or cannot be accessed when a saved OMFIT project referencing them is reopened, the tree entries will be broken.
Best practices
Close OMFIT sessions when they are no longer needed to ensure cleanup occurs.
Periodically check
$OMFIT_TMPDIRif you encounter disk quota or/local-scratchusage issues.Avoid storing large or long-lived data products exclusively inside OMFIT projects; where appropriate, store data externally and link it into the OMFIT tree.
Dynamic expressions
Overview
Dynamic expressions are objects which are evaluated each time they are accessed.
These can be used to dynamically calculate quantities across the OMFIT tree.
You can find several examples of dynamic expressions in the OMFIT['MainSettings'].
In this context dynamic expressions are useful because they allow us to define variables based on things which may change, like the directory where OMFIT is installed (defined at runtime in the OMFITsrc variable), the user which is running OMFIT (based on the environmental variable os.environ['USER']), the home directory of the user (based on the environmental variable os.environ['HOME']), and so on.
Dynamic expressions appear in BOLD in the OMFIT tree.
Defining dynamic expressions
In the example of the figure:
The node OMFIT['MainSettings']['Setup']['ModulesDir'] is equal to the dynamic expression os.path.abspath(OMFITsrc+os.sep+'..'+os.sep+'modules')+os.sep.
As mentioned before, OMFITsrc is a variable defined at runtime which specifies from where OMFIT is run; os.sep is equal to the directory separator (‘/’ in Linux and OSX and ‘' in Windows).
This is equivalent to writing:
OMFIT['MainSettings']['Setup']['ModulesDir']=OMFITexpression("os.path.abspath(OMFITsrc+os.sep+'..'+os.sep+'modules')+os.sep")
Notice that OMFITexpression takes a string as an input.
Absolute data access
The OMFIT tree is nothing but a hierarchical set of Python dictionaries.
Objects in the OMFIT tree can be directly accessed by referencing their location in the tree using the syntax OMFIT['...']['...']['...'].
For example, assuming the following tree:
+-OMFIT/
+-v1/
| +-v2/
|   +-v3/
|   | +-v4
|   +-v5/
|     +-v6
+-v7/
  +-v8/
    +-v9
the objects v1, v4, v9 can be accessed by OMFIT['v1'], OMFIT['v1']['v2']['v3']['v4'] and OMFIT['v7']['v8']['v9'], respectively.
Relative data access in scripts and dynamic expressions
For the cases of python scripts and dynamic expressions, a set of pointers is available to allow relative referencing of nodes in a tree. If possible this approach should be preferred over the absolute references, since this allows nodes in the tree to be moved and renamed without breaking scripts and dynamic expressions. Furthermore, use of these pointers provides a generic structure for combining modules, to eventually create arbitrarily-large multi-physics simulations.
The variable OMFITlocation is set to a list of pointers to the entries in the tree leading to the current python script.
Also, the variables root, parent, and this are set to point to the corresponding nodes in the tree.
The variable root refers to the last module in the tree path of the entry, or to the first location in the tree path of the entry (if there are no modules in the tree path).
In addition, the OMFITlocationName, rootName, parentName, and thisName provide a string representation to the corresponding tree locations.
To better exemplify:
e.g. (no OMFITmodule objects):
OMFIT                          <=>   OMFITlocation[0]  <=>  root
OMFIT['v1']                    <=>   OMFITlocation[1]
OMFIT['v1']['v2']              <=>   OMFITlocation[2]
OMFIT['v1']['v2']['v3']        <=>   OMFITlocation[3]  <=>  parent
OMFIT['v1']['v2']['v3']['v4']  <=>   OMFITlocation[4]  <=>  this
e.g. (with ‘mod1’ and ‘mod2’ being OMFITmodule objects):
OMFIT                                    <=>   OMFITlocation[0]
OMFIT['v1']                              <=>   OMFITlocation[1]
OMFIT['v1']['mod1']                      <=>   OMFITlocation[2]
OMFIT['v1']['mod1']['mod2']              <=>   OMFITlocation[3]  <=>  root
OMFIT['v1']['mod1']['mod2']['v2']        <=>   OMFITlocation[4]  <=>  parent
OMFIT['v1']['mod1']['mod2']['v2']['v3']  <=>   OMFITlocation[5]  <=>  this
Command box
The command box features Python syntax highlighting and can be used to execute Python commands and scripts.
To execute a script, users can press the Execute button, or Ctrl+Enter otherwise, like in the console, selected commands can be executed by:
Select text and press
F9to execute selectionIf no text is selected,
F9will execute the line
Ctrl+U or Ctrl+D to explore command history
Guiding principles for scalable module integration
When working with modules one should pay attention that “a module should not need to know anything about its location in the OMFIT tree in order to work properly” When working with hierarchical modules, this translates into: “it’s ok for the parent module to move or modify data in the child module, but the child module should not access data outside of itself (except for dependencies described next).
The entries under root['SETTINGS']['DEPENDENCIES'] allow modules to access data outside of themselves.
These entries are strings that define how certain locations in the OMFIT tree should become available as variables in the OMFIT scripts and OMFITexpressions within that module.
For example:
root['SETTINGS']['DEPENDENCIES']['gEQDSK']="OMFIT['gEQDSK']"
will make a gEQDSK variable that points to OMFIT['gEQDSK'] be available in the OMFIT scripts and expressions within the module.
This would be the equivalent of setting gEQDSK=OMFIT['gEQDSK'] at the top of all the scripts and expressions within a module.
There are keywords that the DEPENDENCIES entries understand and are handy to navigate the modules hierarchy upstream while specifying relative tree locations instead of absolute tree locations.
The most useful is OMFITmodules which is defined as the hierarchical list of modules to reach the module we are working on.
So, OMFITmodules[-1] is the current module, while OMFITmodules[-2] is the parent module, and so on.
OMFITmodules[0] is equivalent to the root of the OMFIT tree itself, that is OMFIT.
For example, to say that the submodule submod module needs to know something from the mod input namelist:
root['SETTINGS']['DEPENDENCIES']['mod_nml']="OMFITmodules[-2]['INPUTS']['mod_nml']"
Now in the scripts and dynamic expression of the submod module, we can refer to that namelist simply using the mod_nml variable.
Developing modules
If changes are made to the copies in an OMFIT session, there is only one way for those changes to get back to an OMFIT repository in a robust way: using File->Export Modules…. The Export GUI allows two types of workflows:
Exporting to one of the repositories listed in File->Preferences->Main->Modules directories or
Exporting to an OMFIT controlled clone of the OMFIT-source repo (in MainSettings[‘SETUP’][‘projectsDir’]+’../.repos/OMFIT-source_<hash>’).
If the structure of a module is set, and changes are only being made to individual scripts, then it can be useful to operate a module in “Developer Mode”.
This can be achieved by checking the box when importing the module, by using the -M command line argument for importing a
module, or by `right-click`ing on a module in the tree and choosing “Convert to Developer Mode”. In developer mode, the
files pointed to in the tree are those of an OMFIT repo directly, and so any changes made to the files are immediately
reflected in the repo. Note that if a session with a module in developer mode is saved, then, in the saved project,
there are copies of the module’s scripts as they existed at the point of saving, and these files are not pointing to the
repo versions if the project is reopened. If the structure of the module is changed while in developer mode, then those
changes still need to be “Exported” via “File -> Export modules…”. Only the scripts of personal installations of OMFIT
can be opened in developer mode, as opposed to scripts of public installations, which cannot be opened this way.
How to recover from a crash
In the event that OMFIT crashes (or dies because it was killed) you can still recover some of the scripts that you were working on.
If the scripts are still open in your editor:
Do not close your editor windows!
Check within the OMFITscriptsBackupDir directory, which contains a copy of the last 1000 scripts which were loaded within the OMFIT tree. The location of the OMFITscriptsBackupDir directory can be identified by looking at the initial lines of when OMFIT starts. For example:
Darwin F-C02PJ2F5F 14.5.0 Darwin Kernel Version 14.5.0: Wed Jul 29 02:26:53 PDT 2015; root:xnu-2782.40.9~1/RELEASE_X86_64 x86_64
Commit 38c6806afd on branch unstable
Installation type     : PERSONAL
OMFITstartDir         : /Users/meneghini/Coding/atom/OMFIT-source
OMFITsrc              : /Users/meneghini/Coding/atom/OMFIT-source/omfit
OMFITtmpDir           : /tmp/meneghini/OMFIT
OMFITscriptsBackupDir : /tmp/meneghini/OMFIT_scripts_backup                      <----
OMFITcwd              : /tmp/meneghini/OMFIT/OMFIT_2017-01-16_15_17_55
Otherwise
You need to reload scripts which were saved in the OMFIT temporary working directory:
Find the temporary working directory of your old OMFIT session. Usually in $HOME/tmp/OMFIT/…
In the maze of the OMFIT temporary working directory, find your scripts (
find ./ -iname '*.py'can help) and open them in your editor.
Then proceed to the following steps:
Reopen OMFIT.
Reload the project you were working on.
For each script that is open in the editor, open the corresponding node in the tree.
Copy the contents of the previously open scripts to the now open scripts.
Save the project.
Close the editor.
Close OMFIT.
Choose yes, delete the temporary directory. This will delete the OMFIT temporary working directory of your previous session
Reopen OMFIT.
Automatically start ssh-agent
If you want to automatically start the ssh-agent every time you login, then put:
source OMFIT-source/bin/ssh_login
in your .cshrc file (only works for (t)csh).